How to Set Up General Ledger Manager connect
To install General Ledger Manager connect, do the following:
- Download the Connect_Installer.exe file from General Ledger Manager onto the computer on which you want to install it. To do this:
- Click Settings in General Ledger Manager and then click Download General Ledger Manager connect.
- In the File Download dialog that appears, click Run to start the download. The User Account Control dialog will appear.
- In the User Account Control dialog, click Yes to allow the download. When the download completes, the General Ledger Manager connect Setup Wizard appears.
- Install General Ledger Manager connect using the General Ledger Manager connect Setup Wizard as follows:
- Click Next on the Welcome page of the Setup Wizard.
- Click I Agree on the Licensing page of the Setup Wizard, if you agree with the licensing terms that the wizard presents to you.
- Either click Next to accept the default folder/path for installation of the utility, or click Browse to select a different folder/path. The default folder/path is C:\Program Files (x86)\Thomson Reuters\General Ledger Manager connect\.
- Click Install on the Ready to Install page of the wizard to install the utility in the folder/path you selected. An installation progress page will be displayed in the wizard to let you see the progress of the installation.
- Click Finish in the Complete Setup page when installation is completed to configure the utility.
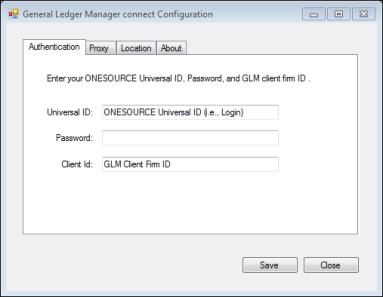
- Once installation completes and you click Finish, the General Ledger Manager connect Configuration dialog appears as shown below. Use it to configure General Ledger Manager connect as follows:
- In the Authentication tab of the Configuration dialog, enter the following: your ONESOURCE Universal ID, related Password, and your General Ledger Manager Client Firm ID.
- If you connect through a proxy server, click the Proxy tab of the Configuration dialog and enter your proxy server URL as well as the related port number. If the proxy server requires authentication credentials, select Enter Credentials and enter the User Name and Password for the proxy server.

- On the Location tab, click Browse and select the path to the location of the General Ledger Manager connect monitor folder. This is the folder in which you will place trial balance files that you want to be automatically uploaded to General Ledger Manager. General Ledger Manager connect monitors it for newly added files and then uploads them to General Ledger Manager. If you do not select a path to the monitor folder, then configuration of the utility will not be able to be completed.

- After completing the necessary fields on each tab in the General Ledger Manager connect Configuration dialog, click Save to save the configuration you entered. A message will be displayed to indicate if your configuration was successfully saved. If the save was successful, click OK.
- Having installed and configured General Ledger Manager connect, you must next start the General Ledger Manager connect service on the computer/server on which you installed it as follows:
- In Windows, click Start button > Control Panel > Administrative Tools > Services.
- In the list of services in Services, locate the General Ledger Manager connect service, right click it, and then click Start in the menu that appears.
- Wait for the General Ledger Manager connect service to start up.
- Once you see that the General Ledger Manager connect service has started, you can place trial balance files to be automatically uploaded in the General Ledger Manager connect monitor folder to which you established a path on the Location tab of the General Ledger Manager connect Configuration dialog.