You can use ONESOURCE Excel Add-in to upload trial balance data to the Import Queue of Import Trial Balances in General Ledger Manager. To do so, you must do the following:
Lay Out the Trial Balance in the Worksheet
In order to properly map and successfully upload a trial balance, its data must be arranged in one of two layouts, depending on whether the trial balance has a single reporting unit or multiple reporting units. The tabular format of these layouts is a common one for systems that may be producing the files you want to use with Excel Add-in. Check your files for adherence to the following characteristics:
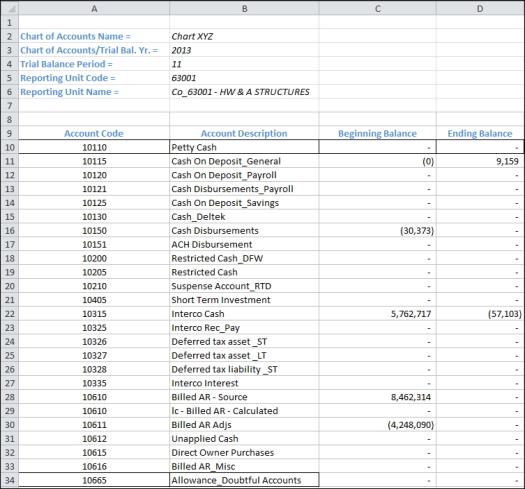
Single Reporting Unit Layout
If the trial balance data that you want to upload has only a single reporting unit, then do the following:
An example of a trial balance for November of 2013 in the single reporting unit layout is shown below.

Multiple Reporting Unit Layout
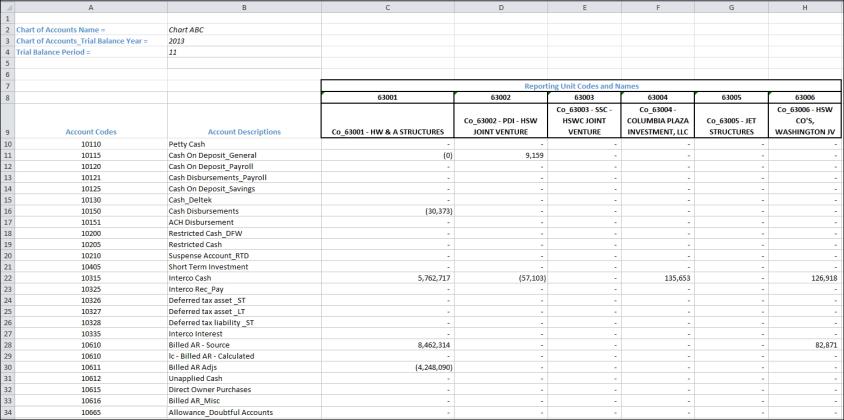
If the trial balance data that you want to upload has multiple reporting units, you must enter the same data in the Excel worksheet with the exception of the column of beginning balances, which cannot be uploaded for trial balances with multiple reporting unit codes.
The data you import using this layout must be arranged in with the account codes (and their descriptions, if you choose) on the Y axis and the reporting units (and their descriptions, if you choose) on the X axis at the top of the table. The ending balances for each account should be entered in the appropriate cell at the intersection of an account code and a reporting unit.
An example of a trial balance for November of 2013 in the multiple reporting unit layout is shown below.
Mapping a Trial Balance in Single Reporting Unit Layout
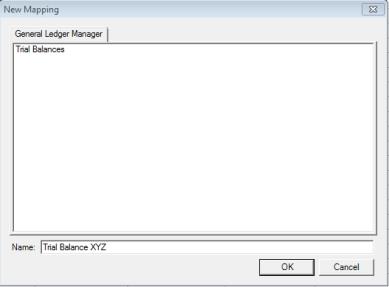
To map a trial balance that has been arranged in the single reporting unit layout, do the following:

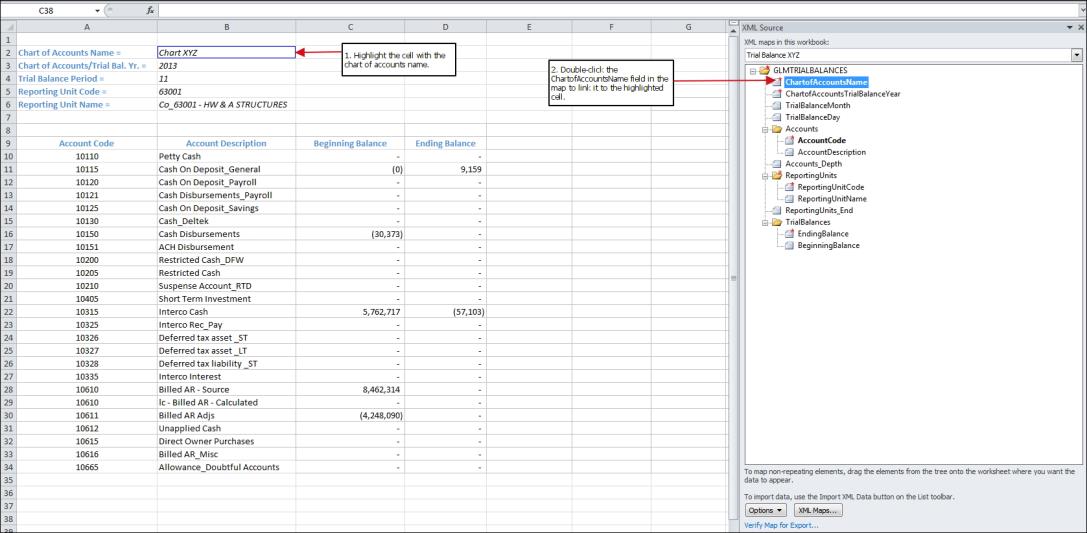


If you labeled your mapped cell with text in another cell, accept the first option, My Data Already Has A Heading, which is the default. However, if you want to apply a header to the cell that is exactly the same as the name of the field to which you mapped it, you can choose to display the header either to the left of or above your linked cell.
Fields in the XML Source pane that are mapped to cells appear bold. When you click a bold field, its linked cell is highlighted and vice versa.
Mapping a Trial Balance in a Multiple Reporting Unit Layout
Mapping a trial balance that has been arranged in the multiple reporting unit layout is similar to the mapping of a trial balance arranged in a single reporting unit layout. The difference is that you cannot map beginning balances, since they cannot be uploaded for a trial balance that has multiple reporting units via Excel Add-in.
Also, since a trial balance in the multiple reporting unit layout is based on a matrix with reporting unit codes on the x-axis at the top of the columns of trial balance data, and the account codes should be arranged on the y-axis, you must define the beginning and ending of the ranges of reporting unit codes and account codes.
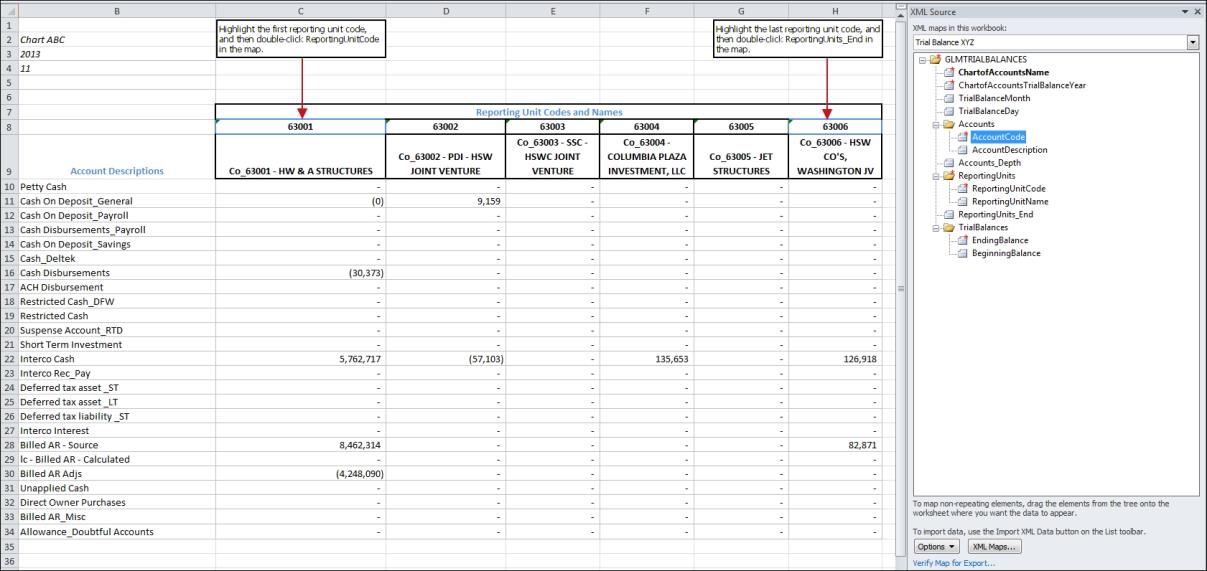
Define the beginning and ending reporting unit codes on the x-axis as follows:
The following graphic shows an example of how to map the beginning and ending reporting unit codes.
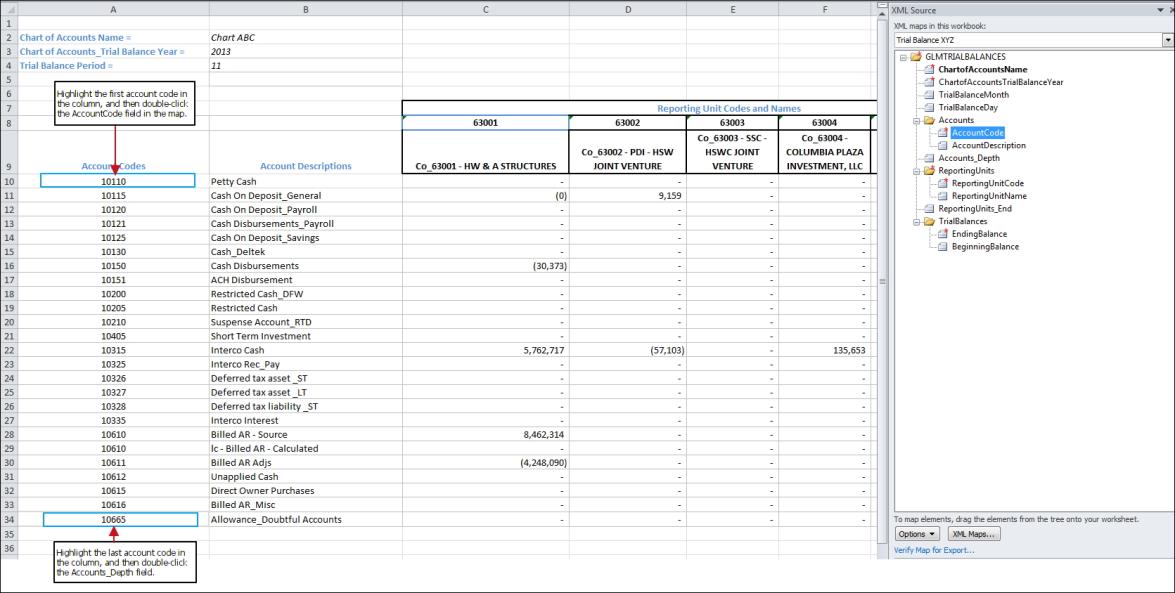
Define the beginning and ending of a range of account codes on the y-axis of the trial balance as follows:
The following graphic shows an example of how to map the beginning and ending of the account codes:
To map all of the cell that may contain ending balances, highlight the cell at the intersection of the first entity code and the reporting unit code. Then double-click the EndingBalance field in the XML Source pane. All of the values in the cells within the boundaries established by the ranges of reporting unit codes and account codes will be interpreted as ending balances for accounts and reporting units where they intersect. A trial balance need not be present for all possible combinations created by the tabular format.
Removing a field-to-cell mapping
If you've mapped a cell in your workbook to a field in the XML Source pane, you can remove the data in the cell without affecting the mapping. To remove the link between a cell and a field, right-click the field name in the XML Source pane. In the menu that appears, choose Remove element.
Removing an entire mapping
You can remove all linked cells at once by removing the mapping to which they are linked from the workbook entirely. To remove an entire mapping, click XML Mapsat the bottom of the XML Source pane in ONESOURCE Excel Add-in. XML Maps appears, listing all of the mappings in the active workbook. Highlight the map you want to remove and then click Delete. Then, click OK.
Validating mapped trial balance data
After you link a trial balance's data to a map, you can validate that you have linked data with all of the required fields in the map and that the data is in the correct format. To validate trial balance data and mappings, click Validate Data in the Data Import tab in the Excel ribbon. A message is displayed to indicate that the validation process has started.A status message appears when validation is complete. You must correct any errors before you can send the data to General Ledger Manager.
Sending the Trial Balance
To sendmapped trial balance data in the active workbook to General Ledger Manager, click Send Active Workbook in the Data Import tab in the Excel ribbon. A message is displayed to indicate that the linked data is being validated. If validation completes with no errors, the upload process begins and a message is displayed to inform you.
When the trial balance data has been uploaded, a message is displayed indicating that the "import process" has completed.
If the trial balance data is not uploaded, an upload exception message is displayed. For example, if the message "To import into General Ledger Manager you must select an account" is displayed,then you have not selected a client in Excel Add-in Settings. Click here for more information about selecting a client in Excel Add-in Settings.