Using ONESOURCE Excel Add-in
If you are licensed to use , you can use it to upload data to General Ledger Manager. For example, you can upload trial balances to the Import Queue in Import Trial Balances directly from an Excel worksheet. This enables you to use Excel files from other systems that you may already use and import their data into General Ledger Manager without even opening the application.
Trial Balance upload
ONESOURCE Excel Add-in can be used to upload multiple trial balances from a single Excel worksheet to the Import Queue at once. Each mapping you add to the worksheet represents a single trial balance. Files you upload to the queue by the manual process or by General Ledger Manager connect must contain only one trial balance.
In the conventional file upload process for trial balances, unrecognized reporting units and account codes produce errors. To increase efficiency when uploading via Excel Add-in, if this kind of data is included in trial balance records, it's automatically added to the appropriate module in General Ledger Manager. This functionality applies to adding new account codes and descriptions or updating existing descriptions and to adding new reporting unit codes and names or updating existing reporting unit names. Since updating this data in Create/Edit Chart of Accounts or Create/Edit Reporting Unit requires that you are an administrator, this role is also required to update this data via Excel Add-in.
Getting Started with ONESOURCE Excel Add-in
To begin using ONESOURCE Excel Add-in with General Ledger Manager, you may have to register as a user. Open Excel and then click the Data Import tab in the Excel ribbon. If you see Register on the tab, then you must complete a brief registration process. If, however, you see all of the functions on the tab, then you are already registered to use ONESOURCE Excel Add-in.
If you have to register, do the following:
- Click Register on the Data Import tab, which is shown below. The Registration dialog is displayed.

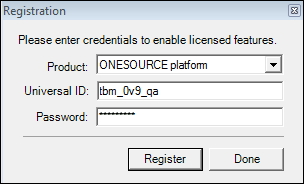
- In the Registration dialog, which is shown below, select ONESOURCE platform in the Product field, enter your ONESOURCE Universal ID and password, and then click Register.

If your ID and password are accepted as valid, you can use ONESOURCE Excel Add-in with the applications for which you have licensed it, and all of the functions are displayed on the Data Import tab in Excel.
NOTE: If the Data Import tab is not in the Excel ribbon, either ONESOURCE Excel Add-in has not been installed for your version of Excel, has not been installed properly, or has been installed, but needs to be repaired.
Selecting the Client
Setting up Excel Add-in also requires that you select the client in General Ledger Manager to whose installation you want to upload data via the Add-in. You must do this even if you are not a third-party provider using the Add-in for multiple clients. To select the client, do the following:
- Click Add-in Info on the Data Import tab in the Excel ribbon. A few options appear under Add-in Info.
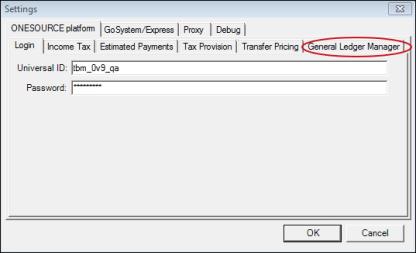
- Select the Settings option under Add-in Info. The Settings dialog is displayed as shown below.

- Click the General Ledger Manager tab in the Settings dialog.
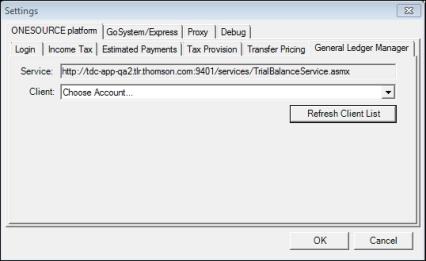
- In the General Ledger Manager tab, which is shown below, click Refresh Client List. Choose Account... appears in the Client field.
- Select the General Ledger Manager client in the Client field to which you want to upload data using ONESOURCE Excel Add-in. For most users, your own firm will be the only selection available. Click OK.

How ONESOURCE Excel Add-in Works with General Ledger Manager
To upload data to General Ledger Manager using ONESOURCE Excel Add-in, you must add a new mapping to your worksheet and then link the fields in the mapping to the corresponding data in the worksheet. Next you can validate the data in the linked fields for required values and formats. If your mapping has no validation errors, you can send the data to General Ledger Manager. You do not have to open General Ledger Manager to upload the data.
Laying Out the Data in the Worksheet for Mapping
For certain types of data entry, the data must have a specific layout in the Excel worksheet in order for it to be properly mapped and successfully uploaded. Trial balances, for example, must be in either one of two different layouts, depending on whether they have a single reporting unit code or multiple reporting unit codes.
Adding a new mapping
You must add at least one Add-in mapping to the Excel worksheet whose data you want to upload to General Ledger Manager. A mapping is a set of related fields that together make up a particular type of data entry in General Ledger Manager. For example, to upload a trial balance to the Import Queue in Import Trial Balances, you must add a "Trial Balances" mapping to the worksheet that has the trial balance.
To add a new mapping to an Excel worksheet that contains data that you want to upload to General Ledger Manager, do the following:
- Click New Map in the menu on the Data Import tab in Excel. The New Mapping dialog is displayed.
- In the New Mapping dialog, select the type of mapping that you want to add to the active worksheet, such as “Trial Balances." The Name field of the dialog becomes active.
- In the Name field, enter a unique name for the mapping you selected and click OK. The new mapping is be added in the XML Source pane on the right side of the Excel workbook. If you're adding a trial balance mapping, the name you enter for the mapping is assigned to the trial balance when you upload its data to the Import Queue.
You can add as many mappings to a worksheet as you require.
Mapping the Data
You must, at a minimum, link the required fields in a mapping to the corresponding cells in the worksheet where the actual data for those fields resides. Specifically, the "trial balances" mapping requires a chart of accounts name, the chart of accounts/trial balance tax year, and at least one reporting unit, account code, and ending balance in order for a trial balance to be successfully uploaded to the Import Queue. Required fields in a mapping appear with a red star in the XML Source pane in Excel.
To map data to an Excel Add-in field, select a cell in the worksheet that corresponds to a field in the mapping. Then double-click that field in the mapping in the XML Source pane. For example, highlight the name of the chart of accounts in a cell that you want to use to upload a trial balance to General Ledger Manager, and then double-click the ChartofAccountsName field in the XML Source pane for the mapping.
You can add multiple maps to a single worksheet in a workbook. For example, you can add multiple trial balance maps, one for each trial balance on the worksheet that you want to upload to the Import Queue. To do so, just add another new "Trial Balances" mapping with a unique name to an existing worksheet that contains your other mappings. When the new map appears in the XML Source pane, link its fields to another trial balance's data in the worksheet. Use the list at the top of the XML Source pane to display the mapping whose fields you want to work with.
Click here for more detailed information about mapping trial balances.
Validating the Mapping of your Data
Once you have linked the cells in your worksheet to fields in a mapping, you can validate the data in those cells. Validation determines whether required fields are populated and that data formatting rules have been observed. To validate your data, click Validate Data on the Data Import tab in Excel. While validation is performed automatically when you send data to General Ledger Manager, you might still want to validate each mapping manually to correct any errors.
Sending the Data
To send mapped data in the active Excel worksheet to General Ledger Manager, click Send Active Workbook in the Data Import tab in the Excel ribbon. The validation and import process starts.
To send multiple workbooks with linked data to General Ledger Manager at once, click the arrow on Send Active Workbook in the Data Import tab in the Excel ribbon and then select Send Multiple Workbooks. In the dialog that appears, select the workbooks you want to send and then click Open.
Results of Sending Data
You can verify the results of an Excel Add-in data upload in the Excel Add-in Log. You can view the log by choosing Excel Add-in Log from the General Ledger ManagerSettings menu. For each upload, the log lists the user that sent the data, the date and time it was sent, and the results of the action.
When you upload trial balances, their account codes and reporting units are checked against the related charts of accounts and the list of reporting units in General Ledger Manager, respectively. Any account codes and reporting units in the trial balances you send that are not found are added to the related charts of accounts and master list of reporting units in General Ledger Manager, respectively, as long as you have administrator privileges. If you do not have administrator privileges, the trial balance can still be added to the queue but unknown account codes and reporting units cannot be added or updated automatically.Trial balances successfully uploaded to the Import Queue appear in the queue as .xml files.
 , you can use it to upload data to General Ledger Manager. For example, you can upload trial balances to the Import Queue in Import Trial Balances directly from an Excel worksheet. This enables you to use Excel files from other systems that you may already use and import their data into General Ledger Manager without even opening the application.


